
Cast your own resin reproduction parts using a silicone mold
Creating a silicone mold to cast your own reproduction of an object is used here to reproduce pinball machine parts. This technique can be applied in a broader area. It's often done my scale modelers. Once you master the process, the possibilities are endless.
Resin statues like shown here are created using the same procedure.
From clay or similar products an original statue is created. A silicone mold is made around it. That mold is then
used to cast the object in resin or epoxy.
Many years ago I have visited the factory of Leblon-Delienne in France. They used
the same production process. Complex statues are cast in separate parts (arms, legs, ..) and glued together before painting.
About ten years ago I already experimented a bit with epoxy. I was looking for a new mountain for my Whitewater pinball machine.
These were not available anywhere, original parts were sold out and reproduction parts were not available. The only solution
I had was to try and repair my own mountain.
Then I bought polyurethane resin. I didn't buy the special silicone to make the mold, because I only found suppliers who
dealt in large quantities. I didn't want to order for over $100 in parts just to make one small plastic part.
I used the resin to repair the cracks in my mountain.
A few years later other people did start to reproduce (first illegal, then legal) the set of Whitewater mountains, and I
forgot all about this resin.
I suddenly became interested again in it after plastic mountains for the Cactus Canyon pinball machine finally sold on eBay.
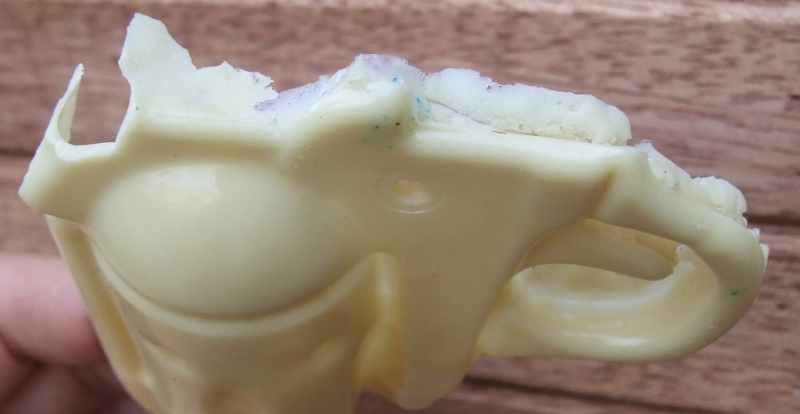
Cactus Canyon is a very collectible pinball machine. I'm happy to own one myself. But there's one plastic mountain on it
(similar to the Whitewater mountains), above the lost mine. This is often damaged. The part is not available from any distributor,
it has been NLA for years.
A few pieces that were in hands of collectors were suddenly sold on ebay and fetched very high amounts (the first went over $500).
The original metal molds to make it had also been sold.
With original parts being too expensive, and little to no chance of having licensed reproduction parts in the future,
the only solution I had was to try and reproduce this piece myself.
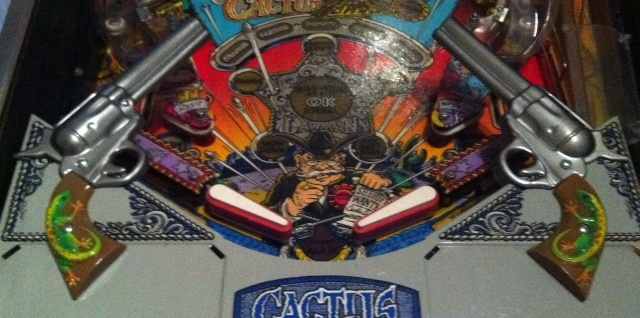
There are also some parts on this pinball machine that I want to customize. The gun handles of the pistols at the bottom
of the playfield are plain color. I would like to customize them by painting them, but I do not wish to use my original
parts for this. Now I can cast my own copies and paint them like I want. When I get tired of it or want to sell my
pinball machine, I can install the original parts again.
The original parts on pinball machines have been made using another type of manufacturing process.
These were made using 2 molds (one for the outside and one for the inside shape).
Liquid plastic is injected under high pressure. Production of series is possible, it's fast and every part
is identical to the other. The molds are very expensive to make (thousands of dollars), but are very strong and
can be used to cast thousands to tenthousands parts.
What I describe here is totally different. I only use 1 mold and only have the outside shape of an object.
Every object I cast is different, it can be a little bit more or less thick than another. The edges are also not
completely perfect. A silicone mold is (relative) cheap to make but doesn't last long. After 15 to 20 casts it can
start to tears and show defects.
The process is not automated, it's very labour intensive. But it's suitable to make a limited run of copies for your own use.
This article is only made for informative purposes. I want to share what I learned and teach you how you can cast your own copies. The objects shown in the pictures (Cactus Canyon lost mine mountain and gun parts) are protected by the legal rights owner. I can copy them for my own use but may not sell these parts as I do not have a license to do so. As it's such a labor intensive process, and parts are not all identical, it is not my intention to apply for a license and start producing on a large scale.
Introduction to silicones
Silicones are a strong but flexible material. They exist in two types:
1-component (which you can buy in DIY stores for caulking) and 2-components.
1-component silicones stick to almost anything. They start to harden when exposed to air.
2-component silicones are totally different. They do not stick very well onto other substances.
They also only start to harden when both parts have been mixed well. This makes them ideal to make molds, as
they capture detailed shapes of any object.
Other types of material (1-component, rubber, or latex based) also exist to make molds.
The 2-component silicone based are best, they are more expensive but shrink and stick less than any other type.
Never make the mistake (like I did with my first test) to use regular silicone to try and make a mold ! Even when you use a product so it doesn't stick (like vasiline or silicone oil), it'll stick anyway or become so hard that you cannot remove the object without damaging it or damaging the mold.
Luckily I found a local supplier where I could order all required products, even in small quantities: www.artsuppliesonweb.be. Ideal when you want to try if it this new hobby suits you..
Required tools to make a silicone mold
2-component silicones. These exist in different types. Each has its own strength, elasticity, .. What type you need depends on the side of the mold you want to make. I use W22 from www.artsuppliesonweb.be.
Hardener. This is the second component you add to the silicones, so they become hard. They need to match the silicone type. Usually you need about 5 percent of harder.
Release agent. This protects your objects, closes small holes and facilitates removing the object out
of the mold.
This also exists in different types, and depend on the material of the mold and object.
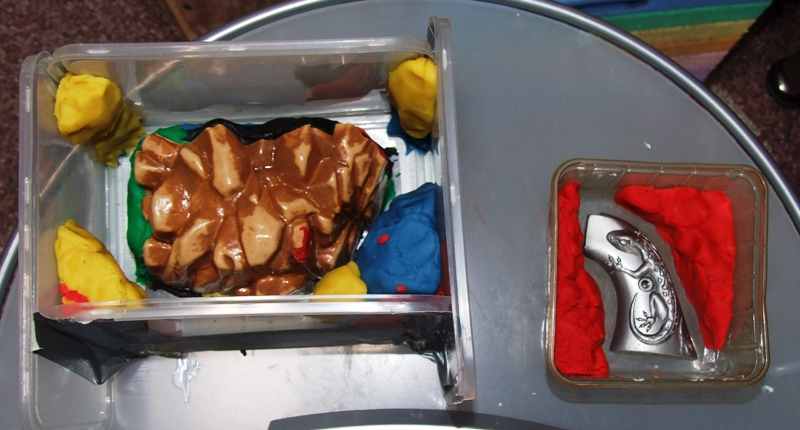
Modeling clay. Like Play-Doh. How much you'll require depends on the shape of the object you want to cast. Use it to close all holes, stick the object to the bottom of the box, .. When the box is too large you can use it to make temporary walls to restrict the amount of rubber silicone to use.
A kitchen scale and small seringes. Both components need to be mixed in quite strict ratios. I measure everything on a digital kitchen scale and have a small seringe (5ml) to measure the hardener component.
You'll need some genereal supplies to mix things: throwaway cups, little spoons, gloves, plastic or cardboard boxes, ..
Making a mold
Making a mold from silicone rubber is not very difficult to do. Several techniques exist, they depend on the shape of the object and the way you want to cast it. Easiest to do are objects that are solid and have a flat side. Most difficult are objects that are hollow or have details all around.
Making a completely surrounding mold is the most difficult. Then you need to make two separate molds that
fit exactly onto eachother. First make one mold, try to stop it somewhere on the border of the object, making it
still possible to release the cast model. Let it dry, then apply a special release agent onto the surface of the mold,
and fill with silicone to make the second mold. Try to put some sticks in so you can later position both parts
exactly onto eachother.
You may have to drill some extra hole to release air from corners in the model, so air doesn't get trapped when you
pour in resin.
But now we'll start making a simple mold first.
Search a box that's just a bit larger than the object you want to make a mold of.
You need about 1 centimeter all around. This depends on the size and height of the object.
Higher and larger molds need to be thicker to keep their shape, so they don't collapse under their own weight.
When making casts of really high parts, sometimes a thin mold out of silicone is made and plaster is added all around it
for extra support. The extra plaster is much cheaper than making a very thick mold out of liquid silicones.
If you don't find a suitable box, you'll have to make something yourself. Make sure you tape off all edges very well
as the liquid silicone will escape trough the smallest hole.. Use Play-Doy to fill up large empty parts, to restrict the
amount of silicone you need to use.
To make removal later easy, don't use a wooden or other stiff container. Try to use something flexible, like plastic.
Even a box out of thick cardboard will do.
First prepare the model with the release agent. Apply a very small layer using a brush. Make sure you get it into every detail. Don't apply too much as that will make the surface of the mold less smooth. Let dry for at least 15 minutes.
Put the object in the box on the flat bottom side.
Hollow parts need to be filled completely with Play-Doy, so the silicone cannot enter underneath the model. This would make
it very difficult to release it later.
You also want as little air as possible under the part, because this can make the object float up in the liquid silicone.
Ready to pour silicone.
Now mix enough silicone and hardener. You have to estimate how many silicones you'll need to make the complete part.
Don't underestimate the amount, for the mold of the mountain I needed 1 kilogram.
If you have too little you can always quickly make a new batch and add it (as long as it hasn't started too dry for too long).
Follow the instructions for the type of liquid silicone. Usually you need about 5 percent hardener.
Stir long enough until it is mixed very well. You have enough time to do this, liquid silicone doesn't start to harden
very fast. Usually you have about 15 minutes to half an hour to mix and pour everything.
Take your time, as most mistakes happen now - not using the correct ratio or mixing well enough.
People that take this hobby serious, sometimes now use a vacuumpump. During mixing you add air into the liquid.
These bubbles can stay onto the surface of the object and cause defects in your mold. With this pump you can extract all air
out of the mixture. A vacuum pump is required when you have rubber/latex based products. The liquid silicone I bought,
releases air from itself.
Use a beaker that's large enough, because in the vacuum the silicone will take up to three times its volume.
Then let it rest until it's taken back it's original size.
If you don't have a vacuumpump, you have to be more careful when pouring the liquid into the box.
To restrict the amount of air bubbles trapped, the trick is to pour the silicone from a high distance (about 50cm) in a very thin stream.
Keep on pouring in a slow rate, always onto the same spot. The silicone will stretch whilst falling down and air escapes.
Start to pour at the lowest point (usually next to your object), so the level gradually increases and no air is trapped
in creases of the object.
Now the liquid will slowly start to harden. Usually you'll start to see small air bubbles pop up onto the surface.
The first time I poked them using a little stick, but I learned this is not a good idea. Stirring or poking will bring more
air into the liquid.
The correct way is to blow gently onto the surface. I've also read that heating gently with a
hairdryer would also work well, but have not tested this myself.
I do shake a bit with the box, sometimes even slam
it a few times onto the table, so airbubbles don't stick onto the surface. Don't slam it too hard because your object
needs to stay stuck onto the bottom of the container.!
When the bubbles don't pop up anymore, just don't touch it and let it harden. How much time this takes depends of the type of silicone (always read the technical bulletin before using the product) and room temperature. Usually it takes 24 hours. My gameroom was a bit too cold, I had to wait two days until I removed the object, and waited another day to let it cure totally.
Removing the object is something you have to do very careful. Remove the Play-Doh as much as possible.
Then try to get the whole mold out of the box in one piece. It may stick a bit to the edge, cut it loose with a knife.
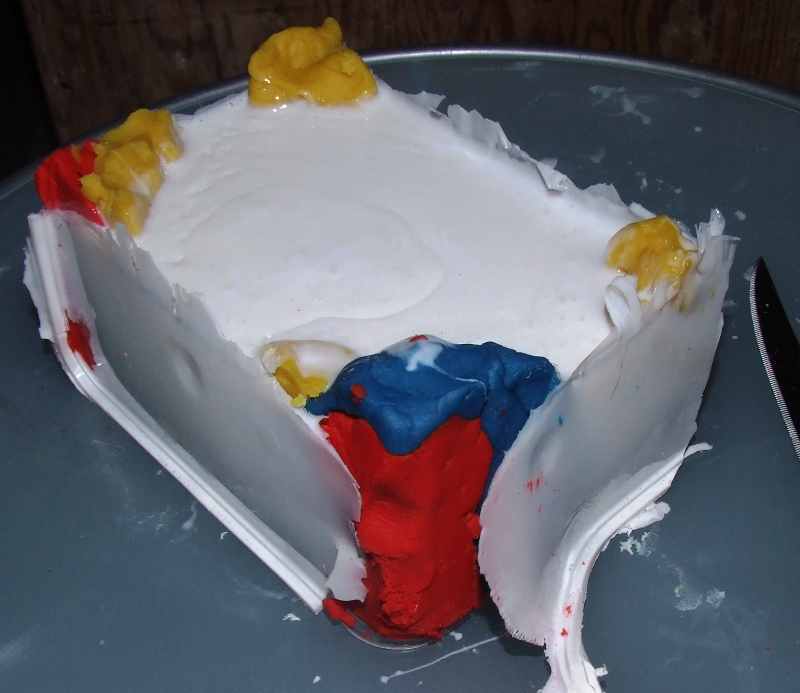
Silicone mold, box removed.
Once it's out of the container, remove the Play-Doy at the bottom of your object (if there was any).
Inspect if the silicone hasn't leaked inside trough holes or over the edge. If so, careful cut this away.
Then you can release the object out of the mold. Try to turn it partially inside out. The silicone is flexible enough to do this.
Push from the bottom the object up so you push it out - instead of trying to pull it out.
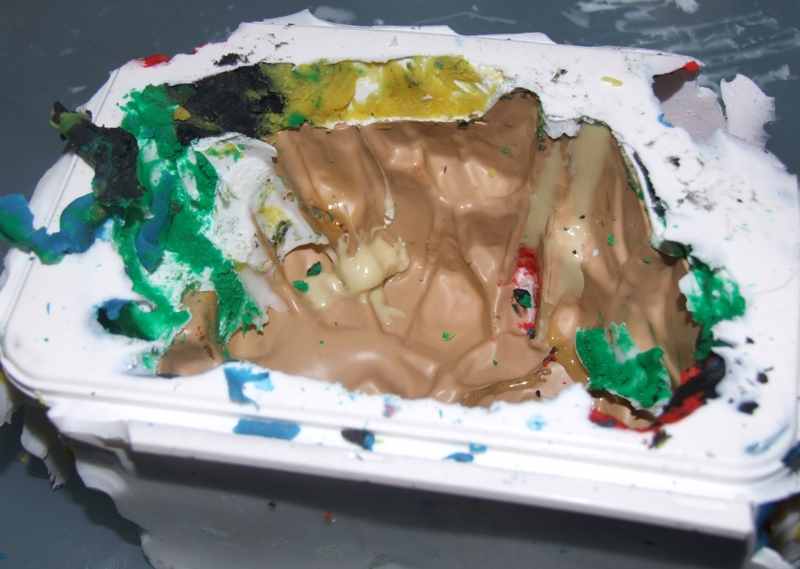
My Cactus Canyon lost mine mountain in the silicone mold. Mold is turned upside-down and the play-doh has been removed.
On the left some silicone poured over the edge, this has to be cut away before I can gently remove the original plastic..
When the silicone has cured completely I first wash it. This removes the rest of Play-Doh and releasing agent. Now the mold is ready for use.
Casting a resin object in a silicone mold
Several products exist to cast objects. You can use plaster, but also 2-component polyester, polyurethane and epoxy resin. Each has their own properties regarding thickness, hardness, color, working temperature and curing time.
The amount of resin you need to fill the volume of your object is something you need to guess the first time. You'll learn by trial and error. Usually the weight of the original object is a good starting point, and add about 10 percent.
I selected to use polyurethane resin. I had this, and it's easy to use. Polyester is more strict regarding room temperature
and humidity, you need to wear a mouth mask, ..
The PU resin is similar to the material the mountain was made from originally. It already has a light brown color (to which you can
add pigment for color). The big advantage is that it has a very short curing time, only eight minutes.
Many suppliers exist, find one locally to you (these products are dangerous and some cannot be shipped by air). I've seen prices between 40 and 70 euro for 2 litres (1 litre resin and 1 litre harder). I use Neukadur Multicast from Voss Chemie that I bought in the past. ArtSuppliesOnWeb sells a similar product.
I started to cast the pistol handles, because they are the easiest to do. Mix the resin and hardener in equal amounts,
and then also pour it in a thin stream. First check the mold is level and be careful not to trap any air while pouring the liquid.
Let it just rest and after about 10 minutes it has totally cured and is ready to be removed (using the same procedure
as when you removed the original part).
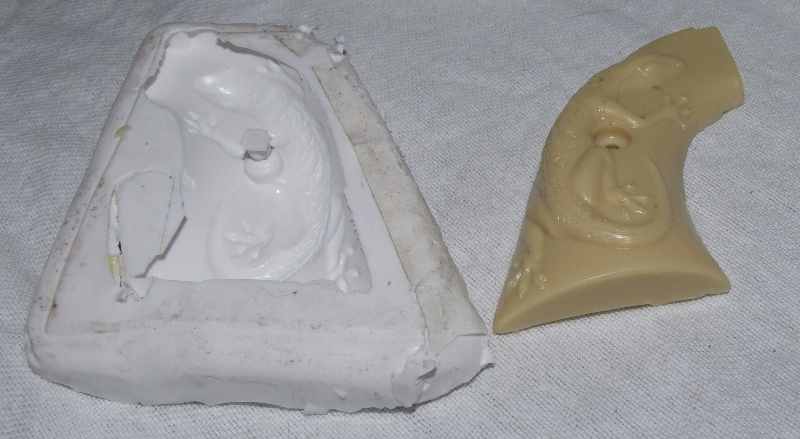
Simple mold for the
Cactus Canyon pistol handle. Just fill it with resin and let it cure.
I had to practise a few times until I knew how much resin to mix and pour in. If you don't have enough, the model will not be
nicely filled until the border and you'll have holes. Fill the mold too high makes it overflows a bit. Or it's not flat
because of the surface tension. The bottom part of the gun handle is then not completely flat, you have to sand a lot
of material away afterwards.
Best is to mix a little bit more and try to fill it as good as possible. Let it dry and then measure the weight.
This will give you an indication of how much resin to mix next time. Mix a few gram extra as there's always
some residu in your mixing bowl.
Casting hollow models in resin
Casting hollow objects like the mountain plastic is more difficult. I needed to try it a few times until I had it right.
As it's hollow, you need to get a thin layer of resin all around the surface.
The first difficulty was to know how much
resin was required. Too much made it too thick, the resin didn't flow enough around to get an even layer all around, and filled all depths.
Not enough resin made the part too fragile and some details and edges were not covered well, leaving seams that broke easily
or even had small holes.
The trick to cast a hollow object is to rotate the mold all the time until the resin has cured.
Professional machines exist that rotate a mold in all directions for many hours. You need them when you use slowly curing resin,
as some resins need to be turned around for almost 24 hours before they're completely cured.
The resin I use hardens in eight minutes. That way you don't need a machine, you can rotate the mold by hand all this time
and cast hollow objects.
Pour the mixture in the mold and start to turn it around. Do not stop moving, never. The mixture flows over all the edges
and a thin layer is deposited to the surface of the mold. It's very liquid and will flow towards the bottom of the mold.
Using a spoon I take it out of the deepest parts and pour it onto the sides where there isn't enough (whilst still rotating).
Suddenly you notice the resin starts to set. Pay attention as it will start very suddenly !
When you notice the resin doesn't flow as well anymore, you have about 10 to 20 seconds to get an even layer all around the surface.
Keep on turning the mold, the resin sticks better to the sides, try to quickly get it into corners where there isn't enough.
Then suddenly the resin sets even more. Now it became too viscous, it doesn't flow anymore but is still a little bit liquid.
Do not touch it anymore ! If you do, it'll stick to your fingers/spoon and you'll tear it away from the mold. It is too late now to
fix any defects, if you touch it you'll ruin the cast model. Just keep on rotating the mold for about 10 seconds.
Then the resin will become hard enough and completely stop to flow. Put down the mold and wait a few minutes to let it cure completely.
Releasing your cast part if similar to how you removed the original part. Start at the top, pull the silicone back and work your way down whilst pushing the model out of the mold. Thin edges are fragile, so be careful not to put too much force on it, or the part may break during removal from the mold.
Finishing cast opjects
You're not done when you've cast an object and the resin has cured. Unfortunately, the most labor intensive part (and less fun) starts now. Finishing and sanding off the edges.
Because epoxy resin pours over the edges of an irregular object like the mountain, the cast object is too large.
The resin doesn't follow the edges we want.
Be very careful when you remove these extra parts. The first time I tried to cut it with cutting plyers.
When I cut trough a thick part, it just broke (not along the edge I wanted to remove) and damaged he part.
Now I use a dremel to gently remove unwanted parts, and use a file afterwards to make all edges smooth.
You have to do this very careful, it takes quite some time.
Here you see
some of the details that need to be removed. This whole edge needs to become perfectly flat so it can be mounted
on the apron of the pinball machine. The hole around the trigger is also filled, needs to be opened without damaging the
trigger part itself.
Note the hammer broke when I removed this part out of the mold.. one more cast object for the trashcan..
When I made a cast of the mountain plastic, a large part of the backside was closed by extra resin that had to be removed.
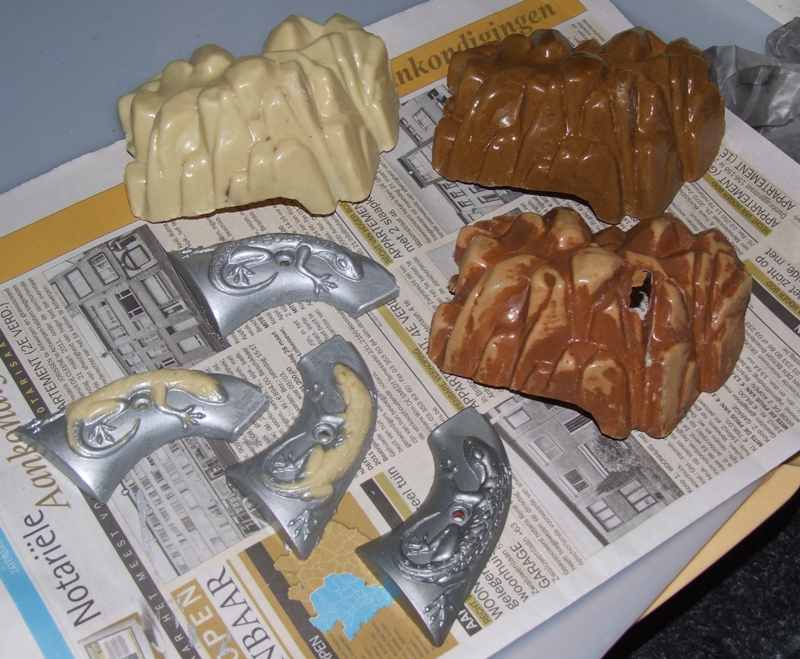
These are my copies, compared to the original parts. Bottom right is the original silver gun handle. The three others
I cast and painted myself. Middle right is my original mountain plastic. Left top is a copy out of plain resin. Top right was my
first try to add coloring pigment, but I had added too much, making it too dark.
Painting resin and epoxy
First wash the resin piece so the paint will stick well. It needs to be degreased, don't touch it anymore with your fingers.
It's a good idea to first apply a layer of plastic primer.
I tried to paint cast parts by brush and using spray cans. It worked well using enamal paints applied by brush (like the silver gun handles).
Spraycans and acrylic paint didn't give me good results (but I'm not experienced with spraycans),
and plastic primer really is required then.
When I have time in the future I'll try to learn how to spray paint well..
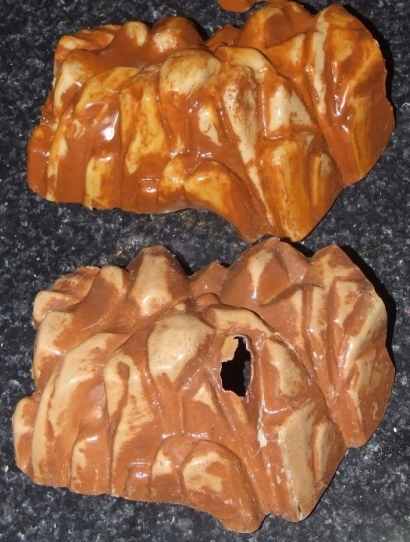
Here is my original mountain and reproduction part.
My mountain plastic is finished. That was the most important piece for me.
The light brown color is created by adding pigment to the resin, it's a pretty close match.
The dark brown color is painted on, and parts have been wiped off to allow the resin to show trough.
My brown paint doesn't completely match the original (it looks more like the Whitewater mountains).
They way the paint is wiped off, is also not a perfect match in pattern with the original.
But I'm sure all original mountains are also not painted in an identical pattern themselves.
I've now installed this new plastic in my game. You wouldn't know the mountain is not original,
unless you're told and can compare it side by side with the original as in the picture.
My new mountain looks good installed in the game, it lights up nicely by the flasher underneath it !
It certainly looks much better than my original with the hole. Note that I decided not to drill a hole on the right side.
It's only secured by one screw on the left (which is a bit hidden from view when playing).
The PU resin also holds up well, I had a pinball that was catapulted in the air because a droptarget rose
above the playfield just when the pinball was above it. The ball smashed full speed into the mountain plastic,
which took the hit without any problem.
Conclusion
Making molds to cast your own parts is an nice experience to do, and not very complicated.
I have a few other ideas to reproduce pinball machine parts so I can paint them like I want, without damaging my
original parts.
The possibilities are endless. On eBay and some pinball shops you can buy custom made plungers.
They have a transparant ball, in which an object is cast (like a spider, to use on your Elvira or Spiderman pinball machine).
Want a plunger with a rock to use on your Whitewater ? It also exists. These are just some examples.
Once you know how to do it you can make your own custom designs. Make a model in clay or Play-Doy, make a silicone mold around it
and then just make reproductions in resin..
Casting resin parts is a very labor intensive process. You really have to do this as a hobby. Just the casting and finishing
of one part, unpainted, takes me at least half an hour. (and I'm not counting any time it took for making the molds).
The Leblon-Delienne factory I spoke about at the beginning of this article ?
A few years ago they moved the whole production to China. It became too expensive to do in Europe.
If you start with an object with errors (my mountain plastic was broken and repaired), copies will be identical, duplicating the faults. Hollow parts are fragile, when you remove them from the mold and finish them (sanding off defects and unwanted edges) you have to be careful not to break and ruin the part.