
Pinball photography 101
I won't go into all basics or details of photography itself. If those interest you, there are enough websites
and books that do. Just remember that light and controlling it is very important.
There are however some general things that you just have to know or do when taking photos of pinball machines.
1. Think how you want the picture to look like.
Sounds obvious but many times this is forgotten. What will the picture be used for:
Ebay sales, your website, decorating your gameroom ? This will for a part influence the lighting:
do you want to show all details ?
What is the subject, the most important part of the picture ?
This will decide what you will focus on, and how your composition will be.
Show a complete playfield, machine, or take a closeup of a specific part.
Think about the photo, take your time, try to visualize it in your mind before you press the button on the camera.
Look at the pictures you just took. Don't use this workflow: look at the viewfinder or lcd screen, take a picture,
find a new angle, take a picture, and continue until you're ready, then upload everything to your computer and see how
they turned out..
Each time you've taken a few pictures, view them on your camera, before starting a new set of pictures.
Check their histogram (read further). Evaluate each picture and see if it turned out like you wanted. You won't see every detail
on the small lcd, but major errors in composition, lighting, .. should be obvious. That way you can immediately reshoot
pictures that are bad.
Take a lot of pictures. In the film days you had to pay much more attention to your set up. You had to know it
was right before you took a picture. Only when the film was developed you knew if it turned out like you wanted it to be.
With digital cameras you can take much more pictures and experiment a bit more. Too dark ? Add more light or change
your exposure or aperture. But write down what you do. Too many times you've taken 10 pictures, have one or two that
are really good, but you don't remember how you created these. You won't become a better photographer that way.
2. Read the manual.
Even if you don't understand anything about photography, you need to know some basic settings of your camera.
- How to turn on and off the (on-camera) flash.
- What light meting modes does the camera have (spot, matrix, ..), can you lock it (AE-lock) ?
- What automatic modes does your camera have ? (portrait, natural light, night, ..)
- Can you set and change whitebalance ?
- Can it display a histogram ? Before taking the picture ?
- Read about the macro feature (the icon for it is a little flower on almost every camera) : check
what your minimum focus distance is with the macro feature enabled and disabled.
3. Remove the playfield glass.
If you want to take pictures of a pinball machine, remove the playfield glass and put the lockdown bar back on.
Unless you make an overview shot of the machine when trying to sell it, then you may need to show it's included.
But for every other picture of the playfield, remove the glass if possible.
Your pictures will improve a lot as it's a source of glare (reflecting lights), fuzziness (it's not cleaned, scratched, ..)
and even unsharp pictures (camera autofocuses on the glass instead of the playfield itself).
4. Horizontal stays horizontal.
Always pay attention to what's horizontal and try to keep your camera perfectly level with it.
Especially when shooting backglasses and playfields. Your pictures will be much better.
Only shoot from an angle because there's a specific effect you want to achieve (which goes back to point 1:
you've thought about how you want the picture to look like). And if so, shoot from a large angle, tilt the camera
20, 30 or 45 degrees. If you tilt the camera only 2 degrees, people will think you couldn't hold it straight and it will look bad.
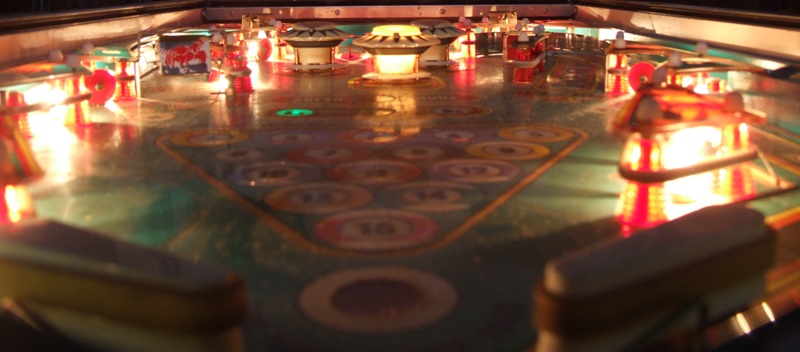
Pay the same attention to centering the camera. If there are any symetrical parts in your picture that are important
(like a shot from above the flippers), try to be either completely centered, or far-enough offcenter.
But not just a little bit off-center as it'll look bad and everyone will say 'too bad it's not completely centered'.

A bit tilted and a bit offcenter..
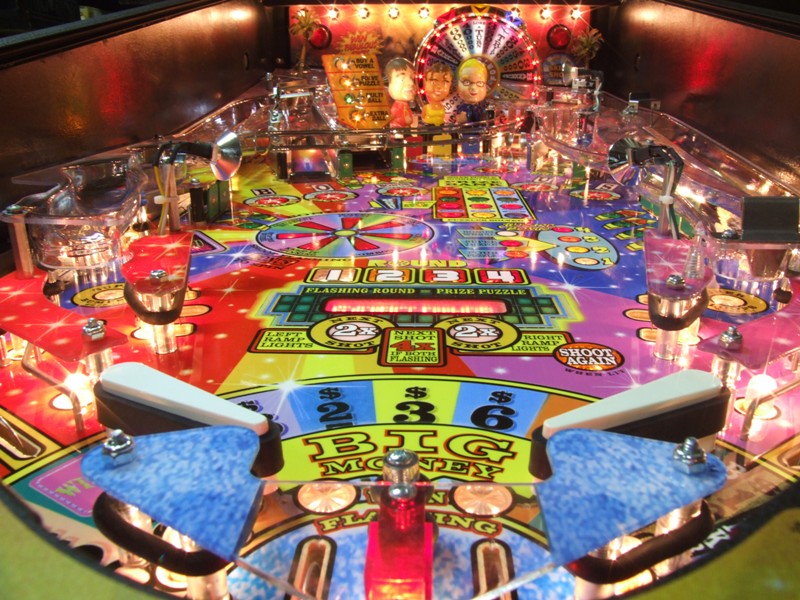
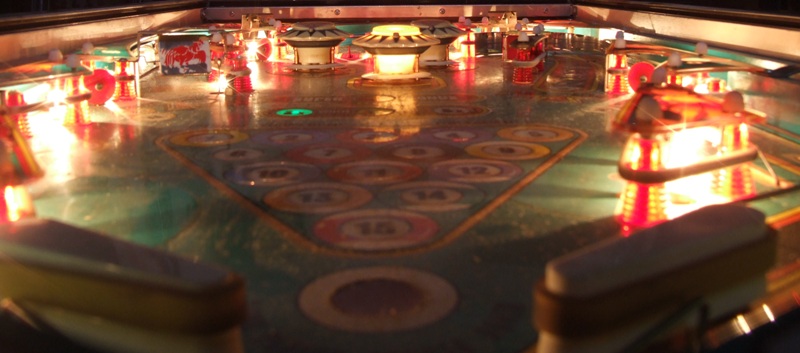
Not tilted anymore (check top of back panel of playfield) and much less offcenter (but not *perfectly* centered either).
5. Camera exposure time.
One 'technical' thing about your camera that you must be aware of is the exposure time of the picture you take.
Depending on the available light, the camera takes a picture very quick (hundreds of a second), up to several seconds.
Especially when you shoot with the flash disabled, in dark conditions the exposure time can become too high
to be able to make sharp pictures handheld. If you zoom in the minimum exposure time increases.
A general rule in photography is that (without using flash, handheld) your exposure time must be at least 1/focal distance.
So if you zoom in to 50mm, you need at least 1/50th of a second or faster. Take a picture more wideangle
at 35mm means 1/35th of a second minimum. If you go lower you'll probably have unsharp pictures because
humans cannot keep a camera exactly still (unless you can stop your heart from beating)..
So in some situations you have no other choice but to use a tripod or add additional lighting.
If you can't do any of these and you really need to take sharp pictures (without flash), you have to increase
the ISO setting of your camera.
Shutter speed of around 3/4th of a second was too long to shoot handheld, result is a blurry picture..
6. Clean and wax the game.
Clean the machine as much as you can. Use windex to clean the playfield glass (if you can't remove it), the backglass, ..
Clean the playfield. With the huge megapixel cameras of today, each spot of dust will show up.
Touching it up in photoshop will take a lot of time. Leaving dust in the picture will draw attention to it,
which you also don't want, you want people to focus on the nice things in the picture.
You probably also want to put a fresh layer of wax on the playfield. It'll reflect more light, the pinball and other
objects on the playfield will show up as reflections on the playfield surface. It just depends on the look you want..
sometimes you may want to position a pinball at a certain point and only put some wax just in front of it..
7. Use a tripod.
Use a tripod if you have one. Use a large tripod to make shots of the backglass and complete playfield,
and a small mini-tripod for closeups on the playfield itself.
A tripod will improve your pictures as it allows you to use longer exposure times that you can't do handheld.
Also use a cable release or the cameras builtin self-timer. Then you don't have to touch the camera to press
the button, as it may cause you to move the camera, get it out of focus, ..
8. Use a polarizing filter.
Most dslr and dslr-like cameras allow a circular polarizing filter to be screwed onto the lens.
A polarizing filter aids in removing reflections (especially on glass, but not on metal).
Some people say to leave it on all the time - I disagree with this.
While most of the shots will look better, the filter does reduce the light entering your camera with 1 to 2 stops,
so your exposure time becomes a longer (which can be a problem when working handheld).
In some situations (especially when shooting playfield details) you want more reflections as they may add to a 3D look.
Just experiment with and without a polarizing filter and see what works best in each situation.
9. Control light sources.
This actually is the most important of all and I could write a whole page only about this..
Most photographs of pinball machines are bad because everyone only uses available light.
If it's too dark, they use the pop-up flash of their camera, casting long shadows,
creating highlights and losing the atmosphere caused by the games light.
If people want to show the lights on the game, they'll completely turn off the light
in the gameroom, and not use flash. Hopefully they'll use a tripod.
Then you'll notice that the available light cast by the lamps on the playfield are not enough to
illuminate everything. You get dark parts on the playfield, can't see a lot of the artwork,
and only see some burnt out spots around lamps.
The major task of a photographer, especially if you want to make 'fine art' pictures is to add just
enough light so you balance everything. The nicest pinball machine shots still clearly show the illumination by
lightbulbs on the playfield, but have enough light added to show details in the artwork. Your task is
to find the correct balance. In most cases you will need to add extra light sources until you reach the balance you want.
The amount and angle of the added light is also important: some shadows are necessary to show a playfield is three dimensional.
Too much overhead softlight will make everything look flat and uninteresting.
But you don't want to cast too many shadows.
There are several tricks to control and add light. There are two types of light in photography:
soft and hard. This is important to know.
Hard light is like the light caused by your flash, or when the sun is shining bright.
It'll cause hard shadows and high contrast.
Soft light is the light when the sky is cloudy: light is diffused.
Everything is well lit but you don't get shadows (or very little), there's much less contrast between dark and light areas.
We'll see later when talking about playfield shots that there are several ways to influence this.
With a little creativity you can make pictures that look like they were shot in a professional studio.
If you want to show every bit of detail on a playfield, just bring your pinball machine outside (in the shade)
on a bright sunny day. Colors will be vibrant, details will show up great, flamepolished plastics ramps will look
brand new, .. Even in a professional photo studio it can be difficult to get similar results.
So for instance when you want to sell your game, take pictures outside. There's a good reason why some specific sellers on ebay
always have pictures with their garage door in the background. The same pinball machine photographed inside
under tungsten light would probably only look half as nice.
Unfortunately we don't all live in places where there is a lot of sun (or we are able to
take our pinball machines outside just to take some pictures) so adding light is important.
Important note: outside you won't be able to see the games own lights, because ambient light is too strong.
Ambient light is necessary if you want to show artwork.
You don't need a professional photo studio or have external strobes for your camera to make nice pictures.
It helps of course. But using some basic things that most people have available, you can act like you have your
own studio and control lighting.
You can get similar results when you light a game using two 500W floodlights. Put one on each side of the game, aimed
towards the ceiling. Advantage of these is that you can easily position them closer or further away.
You can use white sheets to act as diffuser or to bounce light.
A good sittation to photograph a game is where you can bring a game next to a window or door and have a good combination of daylight and artificial light. Like when a game is in a garage, you can adjust the front door (more light or less light) and have the garage florescent lights on. Perfect. You control the amount of light and can take any type of picture you want.
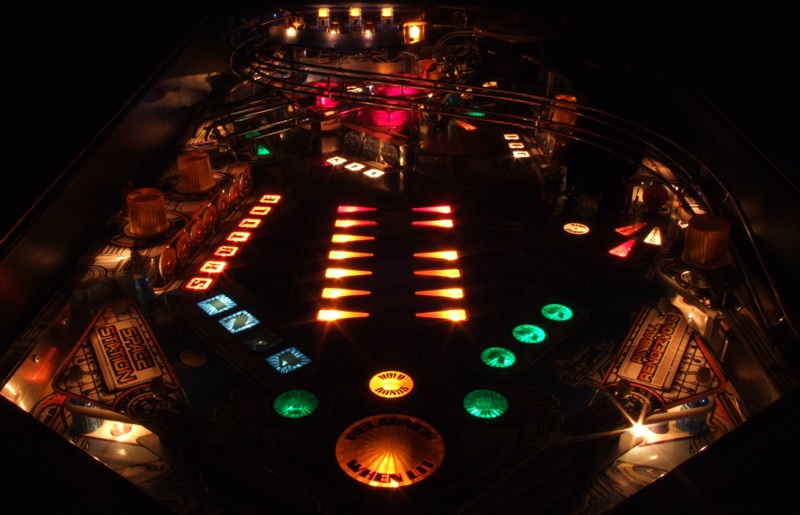
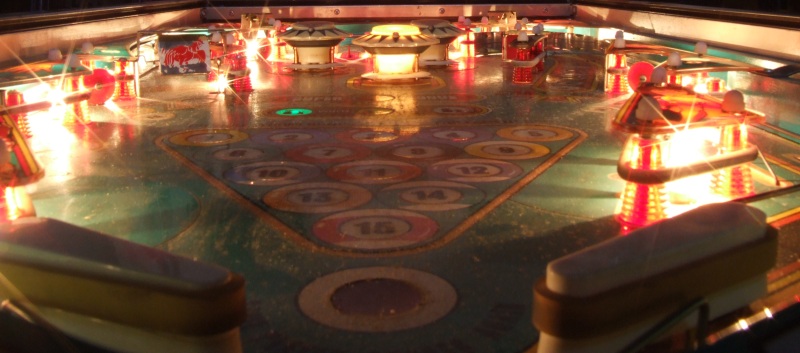
10. Make sure all lightbulbs work.
This goes connected to 'clean the game'. See the picture above ? Blue number 3 and one center arrow lightbulbs are out. You may not notice it immediate when you play the game in a well-lit gameroom, but on a picture like this it's very obvious and distracting.
11. Control the type of light.
Without becoming too technical, you need to know that different types of lightbulbs give off a different type of light.
Most lightbulbs aren't white but give a yellow or even orange to red tint in your pictures.
This was a huge problem when using film cameras (a blue 80A filter had to be used to correct the cast of floodlights),
luckily almost every digital camera is pretty smart. However pretty smart does not mean perfect !
So check the manual of your camera. Especially if you're going to take multiple pictures of the same machine
with the same light conditions: try to set a custom whitebalance if your camera allows it.
If it can't or you don't want to bother, then try to check that at least in every picture there
is something white in it. That way in Photoshop you can alter the whitebalance later.
Some photographers even make 1 picture with a white sheet of paper included somewhere as a reference picture
and then adapt the whitebalance of all pictures shot in that setting.
Anyway as I said, most cameras will do fine, but you have to know whitebalance exists and can be changed if necessary.
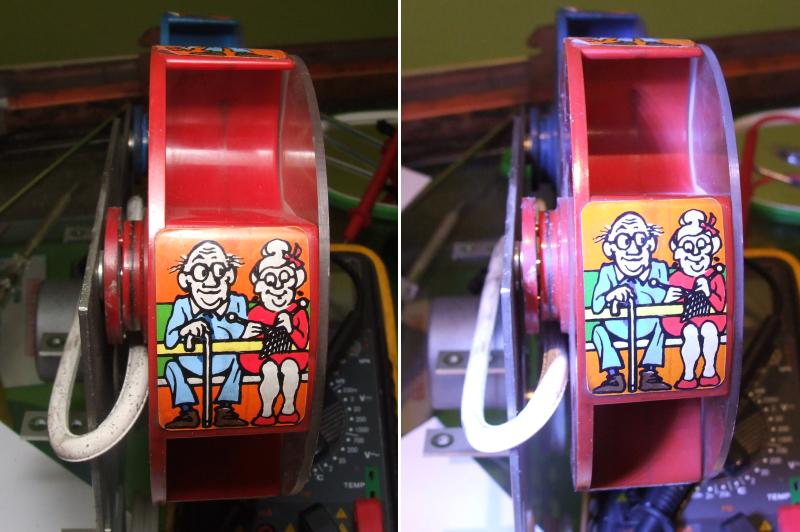
Left picture taken under normal light. Right is extra lit using a white led torch. Notice the camera
registers the white leds as a blue tint.
12. Light source positions
Always watch where light sources are. Especially 'hard' light sources. Not only do they cast shadows but they also reflect and show up as specular highlights (white spots). If you need to add lights, position them in such a way that they do not reflect in the backglass or playfield glass. If you are on a location where you can't change their position, change the cameras position if possible. More on this later.
13. Aperture and Depth of field
OK I didn't want to talk about the technical aspect of photography too much, but I just found some pictures that
just are good for this tutorial.. If you have a dslr I hope you already know this already, and if you only
have a point-and-shoot camera then you probably can't set a lot of these options, but at least it'll explain
why you can or cannot make a specific type of picture.
Aperture controls your depth of field (DOF).
In general, with a smaller aperture (larger f-number), less light can enter the camera
(and thus a larger time is needed to take a picture), and depth of field will be larger.
'Starburst' patterns around lightbulbs will also become more noticeable.
There's also a relationship between aperture and exposure time. If you increase one a stop (ie from F11 to F8) and decrease the other also one stop (from 1/250 to 1/500th a second), the overall light on the picture will remain the same. If you look at the pictures below, the playfield is equally lit in each picture, even though exposure time was completely different. This is what you control in P-mode on a dslr: the camera decides how much light is good - and you can select a combination between aperture and exposure time that'll give you an equal amount of light, but will give you the DOF you want.
On a dslr camera you can use a very wide open aperture (like f2.8) which results in a very small DOF: only one small thing will be in focus and everything behind and before it will be blurred/out of focus. With a point-and-shoot camera this is just impossible to do.
If you have a point-and-shoot camera, you have to know that because of the small lens and camera sensor, it will have a small aperture (like f11 or f14). The result is that you almost always get a lot in focus (which is what most people want) but you also need a lot of light (so you'll always use a flash or must use a tripod).
Anyway, here are three pictures, all manual focussed at the center popbumper, camera on a mini-tripod. When the aperture moved up, exposure time was reduced in an equal amount of stops. The result is an equally lit picture (none of them is much darker or lighter than the other), but you clearly see the amount of DOF and the size of the starbursts around lightbulbs change. At f11 the whole playfield would probably have been sharp.
f3 - 1/8 second: flippers and slingshots are not sharp, no starbursts.
f3.6 - 1/5 second: starbursts showing.
f8 - 1 second exposure - large starbursts, large DOF (flippers almost completely sharp).
This is one of the reasons why a good point-and-shoot is well suited for pinball machine photography and you don't need an expensive dslr: most of the time you want to make pictures of playfields where everything from front to back is very sharp. Another advantage of a small camera is that you can more easily be creative with closeups on the playfield as it needs less room to fit in somewhere..
Disadvantage of a compact camera is that you have less possibilities to change settings.
Remember this: Portrait mode will be more like the top picture, having a short DOF, make the background fuzzy.
Landscape mode will me more like the last picture: everything sharp, large starbursts, ..
14. Check the histogram.
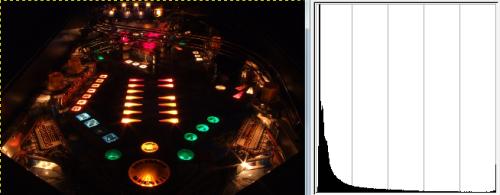
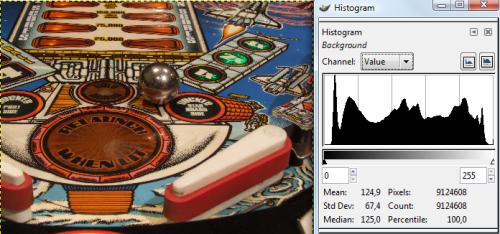
A histogram as viewed in GIMP (a free image manipulation program) and the photo it's from.
A histogram is basically a chart displaying the amounts of each color, ordered by brightness.
Dark colors are on the left, light colors on the right.
When playing around with exposure, you want to try
not to have too much on the extreme borders of the histogram. Everything on the far left is totally black
(underexposed), everything on the far right is totally white (overexposed highlights).
If you play around with color levels, brightness and contrast in a graphics program, you cannot get any
detail back out of the black or white parts. In the picture above you see this clearly: there's a large spike
on the far left of the histogram - a lot in the picture is totally black. All these parts have lost detail - they
only show up as black pixels. No matter how much you play around in any picture editing program, the detailed artwork
on the playfield is lost forever in this picture and will stay black (or turn to grey).
You cannot get back what's lost (clipped on the sides of a histogram).
Always check histograms when you add lights. As long as you have a high contrast (very dark and very light parts) you'll get clippings at both sides. Add more 'fill light' to balance everything out. But make sure you don't add too much light, as it'll can make the picture look uninteresting, with washed out colors. You'll notice this in the histogram, it will also be flat.
Some cameras have very bright lcd screens or even boost the brightness of pictures taken. So when you review
a photo on your camera it may look ok, but when you download it to your computer it is suddenly too dark.
If your camera is like this but can show a histogram of pictures it has taken, checking the histogram will help you identify
underexposed pictures. That way you can change the lighting or camera settings and take more pictures.
You don't want to do a photoshoot of an hour, upload the pictures to your computer and discover they are all
too dark and you need to reshoot everything again..
This is how an 'ideal' histogram looks like. A nice distribution which falls off at each border, no clipping at the edges.
No detail at all is lost, you can brighten or darken the image as much as you want in a photo editing program, change
certain colors, ..
Even the black paint of the apron isn't totally black (but I can make it so). The white flipper bats are still a bit off-white.
I can manipulate the picture to look as underexposed as the picture above.. I can make it look overexposed, or even make
only the flipperbats totally white, or make the lit green inserts look brighter.. it's all my choice in post-processing.
No information was lost in the original photograph, so I can adjust it any way I want.
There's a theoretical ideal distribution, but if a picture looks good or bad is of course subjective.
A good histogram does not mean the picture looks the best possible. It means that all detail is captured.
When you want to take pictures that show as much detail as possible, check the histogram for clipping on the sides
and try to avoid them.
Sometimes you want parts to be totally dark or too bright. It can make a picture more interesting or even more realistic.
This must be a conscious decision you make.
Once you have your lights set up so you get a histogram like this, you can make many types of photographs.
A well-lit room does not mean you cannot make pictures that look like they were taken in a darkened room.
If you have a camera that allows you to manually set exposure time and aperture, just use an extremely short
exposure time.
If your camera doesn't allow manual changes, try if some of the predefined programs (like portrait)
make the picture look more like you want. In most editing programs you can play with contrast, levels and other settings
to adjust it more.
15. Light metering
This is especially important for people with compact cameras. I expect people with dslr to know what they do
and what they want and to adjust their exposure themselves.
Almost every digital camera lets the user chose between spot or matrix light metering. Check your manual.
In spot mode, your camera will check what's in the center of the picture and adjust exposure for that.
Bright/dark parts at the border of the image may become over- or underexposed.
Matrix metering will look at the whole picture and setup lighting for the average.. but in pictures with very dark
and very bright parts, this may result in almost nothing to be well lit.
Other types exist like centered spot metering (a combination between both, parts in the center are more important than
on the border).
What mode you want to use will depend on your composition and if there are large differences in brightness.
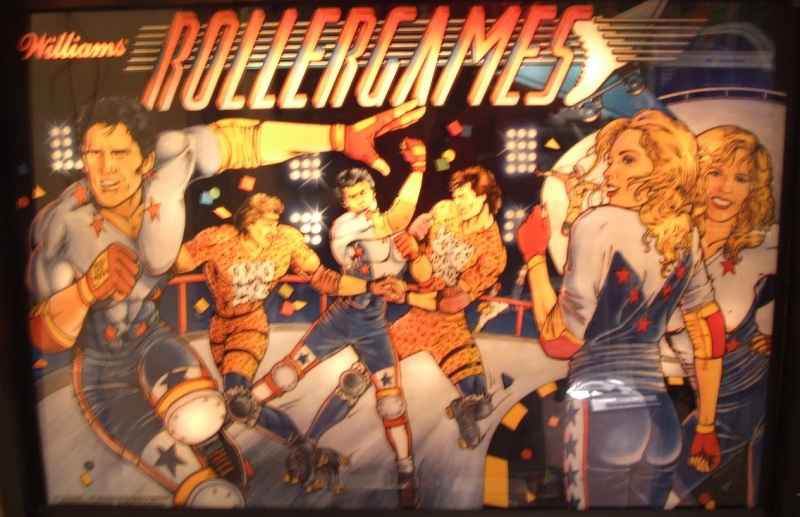
Most backglasses are best shot with matrix metering.
Playfield shots are usually best shot with spot metering, especially if the subject of the picture
is also in the center of the composition (and if it's not, learn to use AE-lock).
Parts of this tutorial:
- Introduction
- Photography 101
- Backglasses
- Playfields
- Pinball closeups
- Plastic ramps