Photographing pinball ramps
A few tips on how to photograph clear plastic ramps (and other smooth plastic parts).
Clean ramps
Make sure a plastic ramp is clean. You don't want to show dirt.
Show reflections
Most people want to show how clear and reflective ramps are. Especially when you want to sell a game you
want to impress buyers, and have your game look as good as possible. You've cleaned all ramps, flame-polished them,
they look brand new, everything is smooth as a mirror.. but when you take pictures of your game, most of the time
plastic ramps still turn out as a dull grey mess. Buyers believe their eyes and how it looks on pictures.
It doesn't matter how great the game looks in person or how many times you say it does..
So, how do you make the game look as good (or better) as it does in reality ?
Remark: only on a brand new, never played, just taken out of the box pinball machine ramps will be very clear and probably almost not show at all.. but once the game has been played a lot, most ramps turn out a bit grey and unclear on photos..
Key here is (same as always in photography) is to control lighting and reflections.
Whenever you want to photograph something reflective: metal, glass or clear plastic, you don't light
the object itself but you light and control what it reflects.
Clear plastic (unless it's yellowed by age) doesn't really have much an own color. It looks like it does because
it reflects everything around it, or distorts color underneath it. If you want to show the shape of a ramp, its curves,
then put some kind of light into its edge (a flashlight may do the trick). If you want to show how smooth your flamepolished
plastic ramps look like, you need to control and light what's reflected by the plastic.
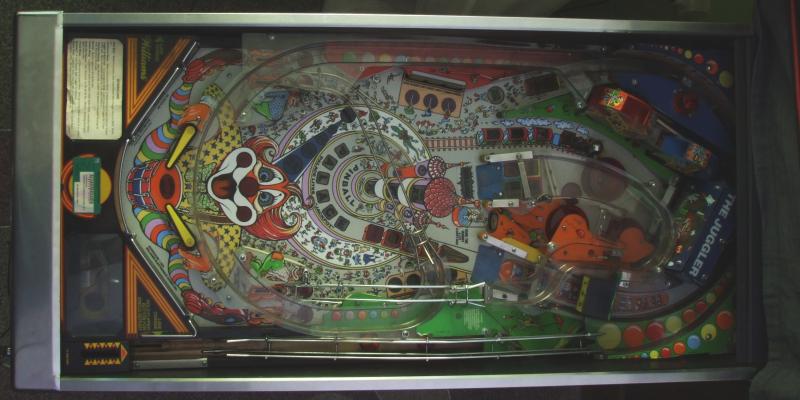
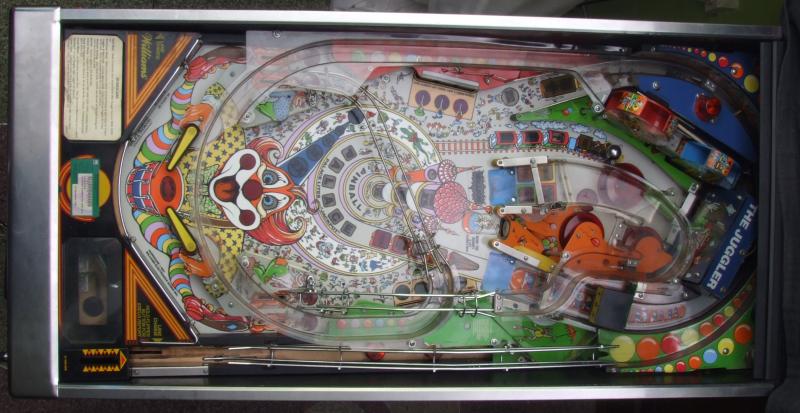
Take a look at the next two pictures. It's an old game, ramps were flamepolished but are not perfect. I'm sure the look most people want, especially when selling a game, is of the second picture. The plastic ramps reflect light and look smooth, although you can still look through them and see details of the playfield and plastic underneath them.


As you can see, camera position in both pictures is the same. Both pictures are lit by one flash
(but a floodlight would also work), from the side (top in picture).
So what's the magic ingredient ? The angle of where
the light is coming !
In the first picture, the flash strobe is more or less horizontal, and illuminates the playfield directly.
In the second picture, the flash was aimed towards the white ceiling of my gameroom. The flash illuminates the ceiling
and bounces off onto the playfield. Ramps look smooth because they reflect a bright white illuminated ceiling.
Remember in the beginning of this article I wrote you'll get the best pictures when you take your pinball machine outside on a sunny day ? Ramps will look good from almost every angle, because they'll reflect a very bright sky.
Inside a house it's a bit more difficult to achieve similar results. Important is to achieve a bright, even illumination. If you don't have a flash, you can also put a floodlights left and right from your game, pointing directly upwards.
Keep your camera position so that you'll reflect the bright lit ceiling (if your angle is too low above the playfield, you'll reflect the backbox or walls).If your gameroom doesn't have a white ceiling, then make it white. Take a white sheet or anything else that's white
and large (a large piece of white plexi, cardboard, ..) and hang it on your ceiling above the game.
That will be easiest to work with.
If your ceiling has any other light color, it may work too. But watch out, especially if you don't provide
additional illumination, because the color of your ceiling can cast onto your playfield..
And yes, it's even possible to have a black ceiling show up as white, if you use enough light.
But if you have that amount of strobes available then you probably know already yourself how to take pictures of playfields..
Parts of this tutorial:
- Introduction
- Photography 101
- Backglasses
- Playfields
- Pinball closeups
- Plastic ramps
